Open Ticket List
About the Open Ticket List
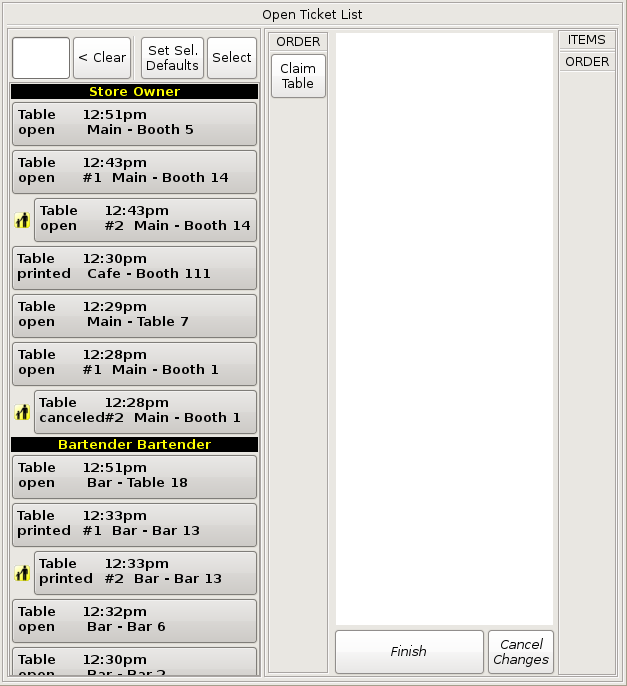
The Open Ticket List on the left side of the screen is where orders will show up and can be viewed, modified, split, printed, paid, etc. Nearly every task that can be done to an order can be done from the Open Ticket List.
There are also special versions of the Open Ticket List for Delivery, Drive Thru, and Pickup Orders. These are similar to the normal Open Ticket List in every way, except they move all of the specified order types to the top.
This is especially useful where you have a terminal or register dedicated to these types of orders.
The Open Ticket List can be used to search for past orders, as well as display only the orders you need to work with.
As orders are placed and entered into the POS, they will appear in the Open Ticket List.
The order type such as Table or Pickup is displayed on the top left of the order's button.
Status, such as Open, Printed, Paid, or Canceled is shown below it.
You can also see when the table/ tab was started, as well as the name of the tab or table associated with the order.
Searching Buttons in the Ticket List
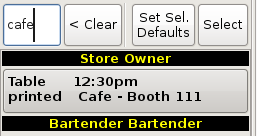
The Search text box shown on the top left allows you to search orders by Names, Table Number or Table Section. The Open Ticket List will fill with orders that contain the first letters that are typed in the search. Make a selection from the list or continue typing to narrow down the search results.
The Search function only searches buttons that are currently displayed in the ticket list. All searches in the ticket list search the bottom line of text. In the image on the left, the searchable text would be Cafe - Booth 111.
Setting Your Defaults
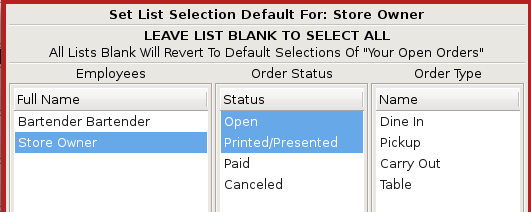
The Set Selection Defaults button allows you to select what orders will appear in the ticket list by default. The tickets can be filtered by Employees, Order Status and Order Types. Anything highlighted in blue will be shown. If all options are left blank, they ALL will be shown.
So to see all of the employee orders, make sure that nothing under employees is highlighted.
This also works for Order Status and Type.
A good place to start would be to have only the following highlighted, leaving everything else blank: Open, Printed/Presented.
NOTE 1:If someone says their orders are disappearing, the most common cause is that they don't have Printed/Presented highlighted under the Set Sel Defaults button. |
Searching For Orders
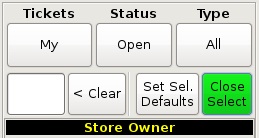
Just as you can set what the Open Ticket List shows by default, you can also make it show a different selection by using the Select button.
Selecting orders under the Select button is temporary, because once you leave the home screen the list will revert back to the original defaults.
Click the Select button and the list options of Tickets, Status and Type will appear.
Click on the Ticket, Status and Type buttons to show a drop down that allows you to modify which orders are seen in the list.
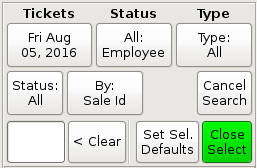
Under the Tickets button:
My Orders, All Employees and By Employee(s) let you pick whose orders to show.
Search is your other option, letting you search for orders on different Dates, or by Sale ID.
Status and Type lets you show the order of a certain Status or Type only.

Working With an Order
To view an order, find the order in the left list and click it. The button will be highlighted in green on the column to the left, indicating the order you are currently dealing with.
The list on the right will then display the ticket's content including Date, Time, Sale ID and Table Number. The food items are shown on the ticket along with the total price and discounts.
You can now make changes you need to the selected order using the buttons on the left and right of the tickets' content. Not all of these buttons will appear in all cases. Many of the buttons are disabled depending on the state of the order selected.
For example: an already paid order can't be modified, so it will have very few options.
Most of the tasks for dealing with orders have their own buttons. A few of the buttons will open small menus with several options.
Throughout the POS system, you may encounter buttons whose text is italicized. All of these buttons have a secondary function you can activate simply by holding the italicized button down.
For Example: In the image to the left, the Print Check button is italicized. If you were to hold it, it would skip the verification box and print immediately.


Summary of Functions
On the left side of your order you have the following options:
Pay: Go to the Pay screen to complete the transaction.
Add To: Add additional items to the order.
Print Check: Print the check as is.
Print Checks: Print multiple checks in the case of a split check.
Split Check: Split the check into multiple checks.
Split Items: Split items between checks that are split.
Move Order: Move the order from one table to another.
Cancel: Cancel the order.
Print Ticket: Print/send a service ticket that you put on a hold so that you could choose when the kitchen received the ticket.
RePrint Ticket: Reprint a service ticket.
Comb. Checks: Move or copy items between unrelated checks by picking a second check to work with at the same time as your currently selected check.
Credit Card: Lets you add a pre-ran transaction to an order.
Claim Table: Claim someone else's table as your own. Alternatively, you can claim ALL tables or tables of another employee.
On the right side of your order you have the following options:
Seat Num: Add/edit seat number on an item.
Copy Item: Copy the selected menu item or ticket. Hold button for multiple copies.
Del: Delete the item. Hold to skip the confirm box.
Edit Item: Edit the menu item you have selected.
Coupn: Apply a coupon or manual discount to an item.
Cash Vouch: Turn an item into a Cash Voucher.
Ticket Opt: Add ticket note or set ticket to carry out. Works on a selected ticket, or on the next ticket added to the order.
Order Opt: Popup menu with several categories of less commonly used options shown below.
Gift Cards/Vchr: Add a gift card or voucher to the sale, or apply a gift card to total.
Cash Back Lets you add cash back to the sale. Sometimes used for quarters for pool table, etc.
Order Disc: Discount the order with entire order discount, manual discount or multi-item discount.
Also used to apply a discount card to the sale.

The Order Options Menu
Customer Member
Set Customer: Lets you assign the order to a customer or change customer. Often for delivery or catering.
Apply Customer Credits: Apply credits to the order. A ticket must have a customer name entered to apply the credits.
Set Customer Name: Set a name for the order. Often for a pickup order or tab.
Set Member: Lets you assign the order to a membership. Used for members only establishments.
Gratuity
Add Gratuity: Often used for party of 8+.
Gratuitize All: Add gratuity to all checks of a split check.
Loyalty Cards
Add Loyalty Card: For establishments that offer their members incentives for purchasing.
View/Print Loyalty Card details: Displays the loyalty card's information for ease of access or printing. You must assign a Loyalty Card to a ticket before you can select this option successfully.
Set Number of Guests: Specify the number of guests so it shows on kitchen tickets.
Set Order Type: Lets you change order type from tab/table/delivery/etc.
Set Taxable: Used to set an order as tax exempt.
Reset Order Time: Change ready at time for a future order.
Set Order Note: Add a note to the current order.
Receipt Coupons
UnDelete all receipt coupons: Restores all receipt coupons that have been deleted.
Reprint Coupon: Reprints receipt coupons.